How to Terminate a Pass-Through RJ45 Plug Correctly
Introduction
Pass‑through RJ45 plugs simplify cable termination by allowing wires to be inserted through the connector before crimping, ensuring the wire order is correct and reducing the chance of reversed pairs. In industrial environments—where vibration, temperature extremes, and electromagnetic interference are common—getting the termination right the first time is critical for network uptime.
In this guide, we walk through the complete termination process, from wire preparation to final testing, using PROUNTA’s pass‑through plugs as the reference platform. We also include a dialogue between a field engineer and a customer to highlight frequent concerns.
Customer‑Engineer Dialogue
Engineer: “Have you checked the wire twists?”
Customer: “I usually untwist all eight pairs to make them lie flat. Is that okay?”
Engineer: “No. Keep each pair twisted as close as possible to the contact—no more than 13 mm (½ inch) untwisted. Excessive untwisting increases near‑end crosstalk (NEXT) and can degrade Gigabit performance, especially on Cat6a and Cat8 links.”
Customer: “My previous terminations failed after a few months in a factory with variable frequency drives. What should I look for?”
Engineer: “Two things: first, make sure you’re using a shielded pass‑through plug if the cable itself is STP; second, verify that the crimp tool applies the correct force. A partial crimp can cause intermittent contact resistance, which under voltage fluctuation can lead to link loss.”
Customer: “Do I need to trim the wire ends after crimping?”
Engineer: “Yes. After crimping, the excess wire should be trimmed flush with the front of the plug. Leaving long protruding wires can create a safety hazard and interfere with the latch mechanism.”
Termination Step‑by‑Step
Step
Action
Key Points
1. Cable preparation
Strip the outer jacket to about 15 mm (0.6 in) from the cable end. Untwist each pair minimally.
Use a sharp stripping tool; avoid nicking the individual conductors.
2. Wire order verification
Follow the T568B (or T568A) pinout diagram. All eight wires should extend slightly beyond the plug body.
The pass‑through design lets you see the wires from the front, confirming order before crimping.
3. Insert wires into the plug
Push each wire fully into its corresponding channel until the insulation abuts the plug shoulder.
The wires should be visible through the transparent housing; no wire should be hidden inside the slot.
4. Check wire protrusion
Each wire should protrude approximately 0.5–0.8 mm past the contact fingers.
Use a gauge or visual inspection; too much protrusion can cause a short, too little can result in a unreliable contact.
5. Crimp the plug
Insert the plug into a ratchet‑type crimping tool designed for pass‑through RJ45 plugs. Squeeze until the tool releases automatically.
A proper crimp compresses the contact fingers around the wire insulation and conductor simultaneously.
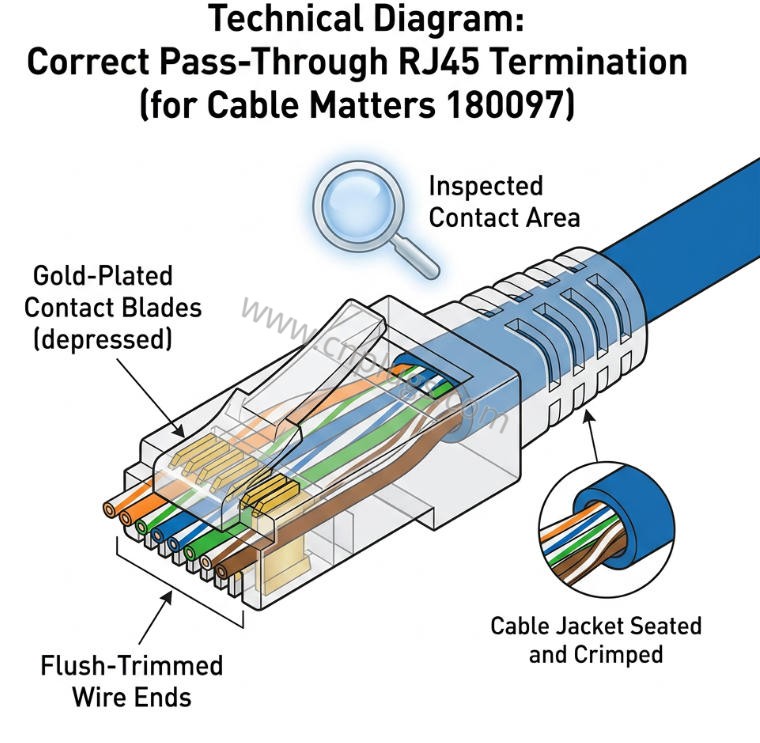
6. Trim excess wire
Cut the protruding wire ends flush with the front face of the plug using side‑cutters.
Leave no more than 0.5 mm of wire; this ensures the strain‑relief boot seats properly.
7. Inspect the termination
Verify that all eight contacts are aligned, the gold‑plated blades are clean, and the cable jacket is seated against the plug’s cable gland.
A magnifying loupe can help spot bent or missing contacts.
8. Test the link
Use a cable tester (ideally one that verifies pinout, continuity, and NEXT) to confirm the termination meets the required performance class.
For Cat6, test to 250 MHz; for Cat6a, test to 500 MHz.
Industrial‑Specific Considerations
Temperature range: PROUNTA’s pass‑through plugs are rated from ‑40 °C to +85 °C, but repeated thermal cycling can stress the polycarbonate housing. Choose the plug material (Japanese PC, UL94V‑2/V‑0) suited to your operating environment.
Vibration and shock: In machinery installations, use cable clips or zip‑ties to secure the cable near the plug, reducing mechanical strain on the termination.
Gold‑plating thickness: For moderate‑corrosion environments, 30 u″ gold is sufficient; for harsh or marine settings, specify 50 u″ gold for enhanced oxidation resistance.
Shielded vs. unshielded: If the cable is STP, use a shielded pass‑through plug (often with a metal housing or an internal grounding tab). Mixing unshielded plugs with shielded cable can create an open‑circuit shield, worsening EMI performance.
Quick‑Check Checklist (before you leave the job site)
Wire pairs untwisted no more than 13 mm.
All eight wires extend past the contact fingers by 0.5–0.8 mm.
Wires are fully seated; no hidden wires inside slots.
Crimp tool is rated for pass‑through plugs and set to the correct gauge.
Excess wire trimmed flush with the plug front.
Cable jacket abuts the cable gland; no bare jacket visible.
Visual inspection for bent or displaced contacts.
Link tested with a certified cable tester.
Conclusion
Terminating a pass‑through RJ45 plug correctly is a simple process when you follow the right sequence and pay attention to the small details that matter in industrial settings. By keeping twists intact, verifying wire order before crimping, and using the proper crimping tool, you can achieve reliable Cat6/E connections that withstand temperature swings, vibration, and electromagnetic noise.
If you need product‑specific guidance—such as the appropriate gold‑plating level for your environment or the correct ratchet crimping tool for PROUNTA’s plugs—contact our technical support team at wa.me/8613428509915 or visit the Product Catalog.

 WeChat ID: